
250x250
반응형
Notice
Recent Posts
Recent Comments
Link
| 일 | 월 | 화 | 수 | 목 | 금 | 토 |
|---|---|---|---|---|---|---|
| 1 | 2 | 3 | 4 | 5 | 6 | 7 |
| 8 | 9 | 10 | 11 | 12 | 13 | 14 |
| 15 | 16 | 17 | 18 | 19 | 20 | 21 |
| 22 | 23 | 24 | 25 | 26 | 27 | 28 |
Tags
- git 업로드
- 다산의마지막습관
- 훌륭한모국어
- Git
- OpenCV
- 클라우드
- 공작과개미
- 비밀번호변경
- 옹졸함
- 중용
- Django
- 헬레나크로닌
- 서울로가자
- php
- linux명령어
- 꼭읽어봐야할책
- 성선택
- 네인생우습지않다
- MySQL
- delete
- todolist
- UPSERT
- Python
- 독후감
- 지방사람이보는서울사람
- ChatGPT
- 나만의주식5법칙
- Face Detection
- db
- 일일투자금액
Archives
- Today
- Total
Terry Very Good
[Object Detection] 3. GUI를 활용한 이미지를 이용한 얼굴/눈인식 본문
728x90
반응형
1. 간단한 이론
Haar-cascade: 영상/이미지에서 오브젝트를 검출위해 사용, 직사각형 영역으로 구성되는 특징을 사용하기 때문에 픽셀을 직접 사용할 때 보다 동작 속도가 빠름
자세한 내용은 https://webnautes.tistory.com/1352 를 참조합시다.
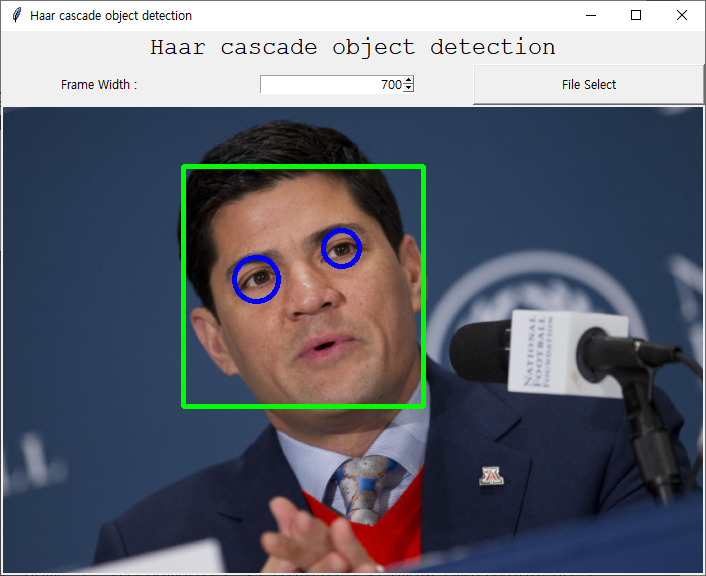
2. GUI를 활용한 이미지를 이용한 얼굴/눈인식
- Library 다운로드
pip install Pillow
- 결과 및 코드


import cv2
import numpy as np
from tkinter import *
from PIL import Image	#PIL 은 pip install Pillow
from PIL import ImageTk
from tkinter import filedialog

def selectFile():	# 파일을 선택하고, 선택한 파일의 경로를 detectAndDisplay()함수로 넘겨준다.
    file_name =  filedialog.askopenfilename(initialdir = data_root2,title = "Select file",filetypes = (("jpeg files","*.jpg"),("all files","*.*")))
    print('File name : ', file_name)
    read_image = cv2.imread(file_name)
    (height, width) = read_image.shape[:2]
    frameSize = int(sizeSpin.get())
    ratio = frameSize / width
    dimension = (frameSize, int(height * ratio))
    read_image = cv2.resize(read_image, dimension, interpolation = cv2.INTER_AREA)
    image = cv2.cvtColor(read_image, cv2.COLOR_BGR2RGB)
    image = Image.fromarray(image)
    imgtk = ImageTk.PhotoImage(image=image)
    detectAndDisplay(read_image)

def detectAndDisplay(frame): # 선택한 파일을 사용하여 Face Detection하고 보여주는 함수
    frame_gray = cv2.cvtColor(frame, cv2.COLOR_BGR2GRAY)
    frame_gray = cv2.equalizeHist(frame_gray)
    #-- Detect faces
    faces = face_cascade.detectMultiScale(frame_gray)
    for (x,y,w,h) in faces:

        center = (x + w//2, y + h//2)
        frame = cv2.rectangle(frame, (x, y), (x+w, y+h), (0, 255, 0), 4)
        faceROI = frame_gray[y:y+h,x:x+w]
        #-- In each face, detect eyes
        eyes = eyes_cascade.detectMultiScale(faceROI)
        for (x2,y2,w2,h2) in eyes:
            eye_center = (x + x2 + w2//2, y + y2 + h2//2)
            radius = int(round((w2 + h2)*0.25))
            frame = cv2.circle(frame, eye_center, radius, (255, 0, 0 ), 4)
 	#cv2.imshow('Capture - Face detection', frame) #이걸 하면 새로운 창을 띄우는 거고, 기존 창에 사진만 변환시켜주려면 아래처럼!
    image = cv2.cvtColor(frame, cv2.COLOR_BGR2RGB)
    image = Image.fromarray(image)
    imgtk = ImageTk.PhotoImage(image=image)
    detection.config(image=imgtk)
    detection.image = imgtk

#main
data_root = 'D:/Computer Vision/ai_cv/image/';
data_root2 = 'D:/Computer Vision/ai_cv/image';
cascade_root = 'D:/Computer Vision/ai_cv/haarcascades/';


file_name = data_root+"marathon_01.jpg"
title_name = 'Haar cascade object detection'
frame_width = 500	#사이즈에 따라 detect 정확도가 다르기에 GUI에 설정가능하도록 바꿔준다.

main = Tk()
main.title(title_name)
main.geometry()


read_image = cv2.imread(data_root+"marathon_01.jpg") #초기에 선택할 파일
(height, width) = read_image.shape[:2]
ratio = frame_width / width
dimension = (frame_width, int(height * ratio))
read_image = cv2.resize(read_image, dimension, interpolation = cv2.INTER_AREA)

image = cv2.cvtColor(read_image, cv2.COLOR_BGR2RGB)
image = Image.fromarray(image)
imgtk = ImageTk.PhotoImage(image=image)

face_cascade = cv2.CascadeClassifier()
eyes_cascade = cv2.CascadeClassifier()

#-- 1. Load the cascades
if not face_cascade.load(cv2.samples.findFile(face_cascade_name)):
    print('--(!)Error loading face cascade')
    exit(0)
if not eyes_cascade.load(cv2.samples.findFile(eyes_cascade_name)):
    print('--(!)Error loading eyes cascade')
    exit(0)

label=Label(main, text=title_name)
label.config(font=("Courier", 18))
label.grid(row=0,column=0,columnspan=4)
sizeLabel=Label(main, text='Frame Width : ')
sizeLabel.grid(row=1,column=0)
sizeVal  = IntVar(value=frame_width)
sizeSpin = Spinbox(main, textvariable=sizeVal,from_=0, to=2000, increment=100, justify=RIGHT) # 이미지 픽셀 사이즈를 0~2000까지 가능
sizeSpin.grid(row=1, column=1)
Button(main,text="File Select", height=2,command=lambda:selectFile()).grid(row=1, column=2, columnspan=2, sticky=(W, E)) # 버튼을 누르면 selectFile()함수가 실행된다.
detection=Label(main, image=imgtk)
detection.grid(row=2,column=0,columnspan=4)
detectAndDisplay(read_image)

main.mainloop()
728x90
반응형
'신기술 습득' 카테고리의 다른 글
| PDF에서 스크린샷찍은 것을 아웃룩 메일에 붙여넣는 2가지 방법 (0) | 2023.03.08 |
|---|---|
| [Cloud 기초]-1 Cloud 이론에 대한 모든 것 (0) | 2022.06.25 |
| [Object Detection] 4. 영상을 이용한 얼굴/눈인식 (0) | 2021.09.05 |
| [Object Detection] 2. 이미지를 이용한 얼굴/눈인식 (0) | 2021.09.05 |
| [Object Detection] 1. OpenCV 기초(영상처리) 지식 학습 (0) | 2021.09.03 |
'신기술 습득' Related Articles
more


